Keine Produkte im Warenkorb.

If you have ever reached the bottom of your website and asked, “How do I edit the footer in WordPress?” you are asking a very common WordPress question. The footer looks like a small part of the page, but it appears across many areas of a site and often holds important information that visitors expect to find quickly.
A WordPress footer may include a copyright line, contact details, policy links, social media icons, newsletter forms, navigation menus, business disclaimers, or a short brand introduction. It is also the place where many themes show default text such as “Powered by WordPress.” For a personal blog, that may be acceptable. For a business website, online store, or professional portfolio, you usually want the footer to match your own brand and guide visitors to the right next step.
The important thing to understand is that WordPress does not offer only one footer editing path. Your method depends on your theme type, editor, plugins, and whether you want to change the footer sitewide or only on one page. This guide explains the main options in a simple, educational way so you can choose the method that fits your website.
The footer is the bottom section of a WordPress website. It usually appears after the main content and is repeated across posts, pages, product pages, archives, and other templates. Because it sits at the end of the page, many beginners ignore it. However, users often scroll there when they cannot find contact information, support links, policies, or secondary navigation in the header.
Think of the footer as a quiet information center. It does not need to repeat your full homepage, but it should help visitors complete common actions. A clean footer might include your logo, a short description, contact link, Privacy Policy, Terms of Service, FAQ, social links, sitemap, newsletter signup, and copyright notice.
A useful footer can also make the website feel more trustworthy. Outdated links, missing legal pages, or generic theme credits can make a site feel unfinished. A well-edited footer gives visitors confidence that the site is active, organized, and easier to use.
Before you edit anything, identify what controls your footer. If you use a modern block theme, you may see Appearance > Editor in the WordPress dashboard. In this setup, the footer is usually a template part. A template part is a reusable layout section, such as a header or footer, that can appear across multiple templates. When you update that footer template part, the change can apply to all pages using it.
If you use a classic theme, your dashboard may show Appearance > Customize, Appearance > Widgets, and Appearance > Menus. Classic themes often manage the footer through the Customizer, widget areas, menu locations, or theme options.
If your homepage or landing pages were built with a visual builder, the footer may be controlled inside that builder instead of the theme. This is common for sales pages, webinar pages, and campaign pages. Knowing your setup saves time because you will not waste effort searching in the wrong area.
For many newer WordPress sites, the Site Editor is the best place to start. Go to Appearance > Editor from your dashboard. Then look for Patterns, Template Parts, or a Footer area. The exact labels can vary depending on your WordPress version and active theme.
Open the footer template part and click into the design. You can usually edit text, update links, add blocks, remove blocks, change columns, adjust spacing, choose colors, and reorganize the layout visually. For example, you might add a Navigation block for footer links, a Social Icons block for profile links, a Paragraph block for a copyright notice, and a Columns block to organize several footer sections.
This method is powerful because it can update the footer across the whole site. Instead of changing every page manually, you edit the shared footer once. After saving, always preview the result on desktop, tablet, and mobile. Footer columns that look balanced on a wide screen can feel crowded on a phone, so mobile spacing matters.
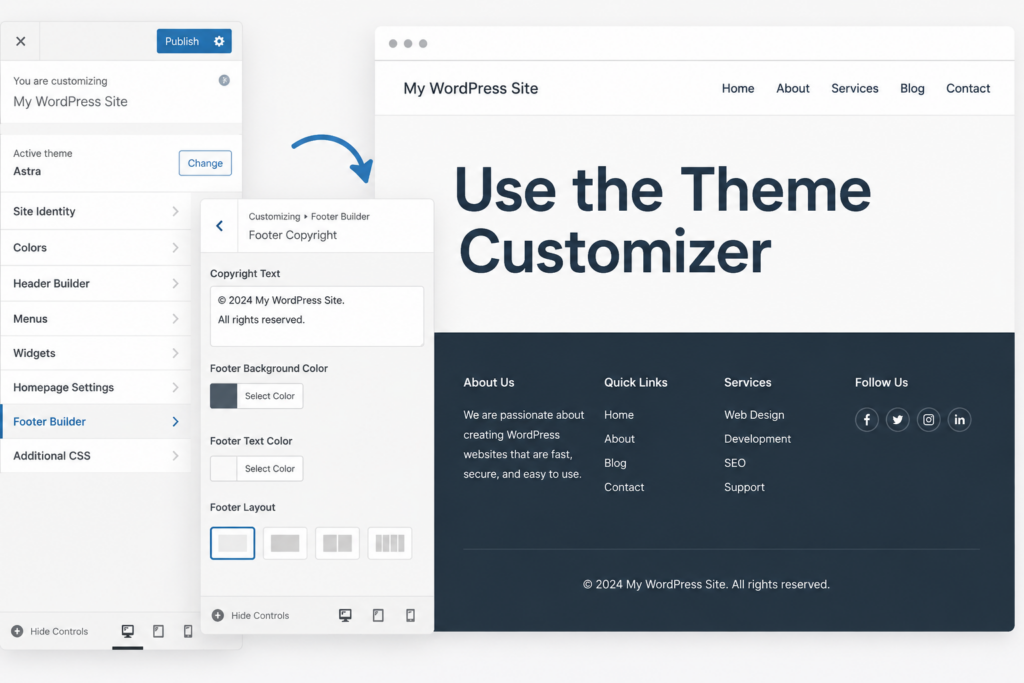
Many classic WordPress themes still use the Customizer for footer settings. Go to Appearance > Customize and look for sections such as Footer, Copyright, Footer Options, Layout, Theme Settings, or Additional CSS. Every theme is different, so the footer control may not always be named clearly.
The Customizer is useful for basic edits. You may be able to change the footer background color, adjust text color, select a column layout, edit copyright text, remove theme credits, or choose which menu appears in the footer. It also provides a preview, so you can see many changes before publishing them.
The main limitation is theme support. Some themes give you detailed footer controls, while others only provide a small copyright field. If your theme does not offer the setting you need, try widgets, menus, the Site Editor, or a page builder instead.
Footer widgets are common in classic themes. A footer widget area is a content container where you can add blocks or widgets without editing code. Depending on the theme, you may see one footer area, three footer columns, four footer columns, or several named footer sidebars.
Go to Appearance > Widgets and look for a section called Footer, Footer 1, Footer Column, or Footer Sidebar. Open the area and add the content you need. You can use blocks such as Paragraph, Heading, List, Navigation, Social Icons, Search, Latest Posts, or Custom HTML.
This method works well when you want to add helpful information without redesigning the entire footer. For example, one column can introduce your business, another can show important links, and another can list contact details. If your email marketing plugin includes a form block, you can also add a newsletter signup.
After saving, check the live page. Themes display widget areas differently, and too much text can make the footer look uneven. Keep each section short and easy to scan.
A footer menu is a simple way to organize important links that do not need to appear in the main navigation. Common footer menu links include About, Contact, Blog, FAQ, Shipping Policy, Refund Policy, Privacy Policy, Terms of Service, Accessibility, and Sitemap.
In a classic theme, go to Appearance > Menus. Create a new menu and name it something clear, such as Footer Menu. Add the pages, categories, posts, or custom links you want to show. Then save the menu and assign it to a footer location if your theme provides one.
If your theme does not have a footer menu location, you may still be able to display the menu through a footer widget area. Go to Appearance > Widgets, add a Navigation Menu or Navigation block, and choose the menu you created.
Keep the menu focused. A footer packed with too many links can feel messy. Use clear labels and group similar links together so visitors can understand the structure quickly.
Sometimes the question “how do i edit the footer in wordpress” applies to only one page. A landing page, sales page, coming soon page, or thank-you page may need a different footer from the rest of the website.
If the page was built with a visual page builder, open that page in the builder interface. Look for footer sections, saved sections, global sections, or page layout settings. Many builders allow you to drag in a predesigned footer section and customize the text, links, colors, columns, images, and mobile spacing.
Landing page footers should usually be simpler than full website footers. They often include a copyright line, privacy link, terms link, disclaimer, or trust badges. The goal is to support the campaign without distracting visitors from the main call to action.
Many site owners want to remove the default WordPress or theme credit from the footer. The best approach is to use your theme’s built-in settings. Start with Appearance > Customize and search for Footer, Copyright, Footer Credits, or Theme Options. If the theme allows editing, replace the default text with your own copyright line.
A clean copyright line usually includes the copyright symbol, year, site or business name, and a short rights statement. This small change can make the site look more professional.
If the theme does not provide an option, some users hide the credit with Additional CSS. This may work visually, but it is better to use theme-supported settings when possible. Editing footer.php directly should be done carefully, preferably with a child theme, because changes to parent theme files can be overwritten during updates.
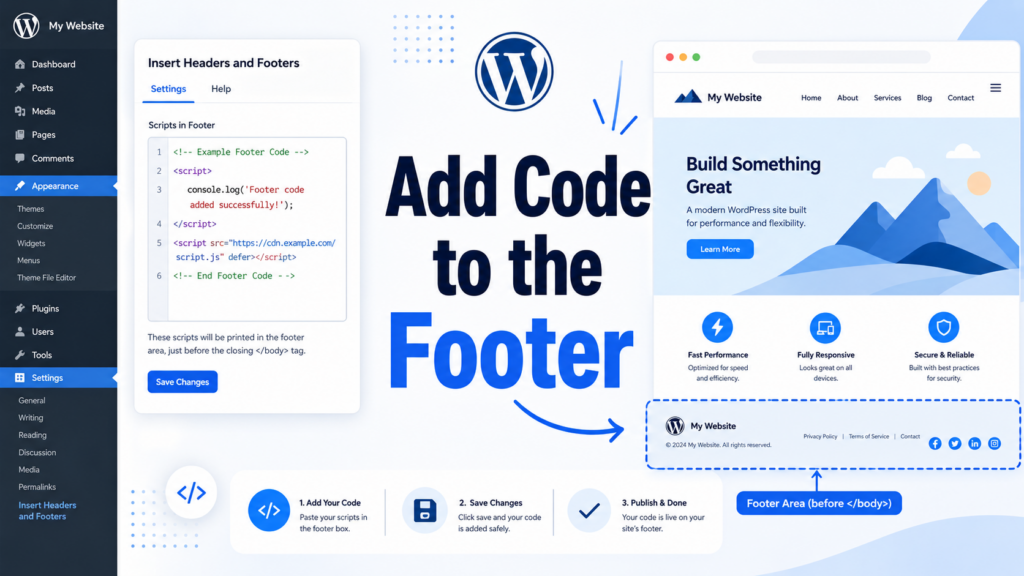
Not every footer edit is visible. Sometimes you need to add analytics code, a tracking pixel, live chat script, verification code, or another script near the bottom of your website.
For most beginners, the safest solution is a header-and-footer script plugin or code snippets plugin. These plugins give you a field where you can paste footer scripts without manually editing theme files. This keeps your code easier to manage and reduces the chance of breaking your layout.
Only add scripts from trusted services. Too many third-party scripts can slow down a site, and unknown code can create security or privacy concerns. After adding code, test your website and make sure pages still load correctly.
In special cases, you may want to hide the footer. For example, a focused landing page or coming soon page may look cleaner without the full site footer. Before using CSS, check whether your theme or builder has a page-level option such as Disable Footer, Blank Canvas, Landing Page Layout, or Hide Theme Elements.
Hiding the footer with CSS can work, but it should be used carefully. Removing the footer can also remove useful navigation, legal links, contact details, and trust signals. In many cases, a minimal footer is better than no footer at all.

A good footer should be useful, simple, and consistent with the rest of the site. Start with the most important links. Most websites do not need dozens of footer links. Focus on pages that help users trust you, contact you, or continue browsing.
Keep text short. Use columns only when they improve clarity. Make sure the footer is easy to read on mobile devices. Avoid tiny text, low-contrast colors, and crowded link groups.
Also review your footer regularly. Update your copyright year, remove broken links, check contact details, and confirm that policy pages are still correct. Because the footer appears across the website, one outdated detail can be repeated everywhere.
If you edit the footer but do not see the change, clear your browser cache and any caching plugin. Cached pages may show an older version of your site.
If you cannot find footer settings, your theme may not support that method. Check Appearance > Editor, Appearance > Customize, Appearance > Widgets, Appearance > Menus, and your builder settings.
If the footer looks broken on mobile, simplify the layout. Reduce columns, shorten menu labels, shrink large logos, and remove unnecessary text. A clean mobile footer is more useful than a crowded one.
So, how do I edit the footer in WordPress? The answer depends on your setup. Block themes often use the Site Editor and footer template parts. Classic themes usually rely on the Customizer, widgets, menus, or theme options. Landing pages may use a separate builder. For credits, scripts, or hidden footers, use theme settings, safe plugin tools, or careful CSS.
The footer is more than a decorative ending. It supports navigation, branding, legal clarity, trust, and user experience. When you choose the right editing method and keep the content clean, your WordPress footer becomes a helpful part of the website instead of an ignored afterthought.
You can edit the footer in WordPress through the Site Editor, Theme Customizer, Widgets, Menus, or a page builder, depending on your theme and website setup. Modern block themes usually use the Site Editor, while classic themes often use the Customizer or widget areas.
The footer is the bottom section of your WordPress website. It usually appears across pages, posts, archives, and other templates. You can often find its settings under Appearance > Editor, Appearance > Customize, Appearance > Widgets, or Appearance > Menus.
Yes, many WordPress themes allow you to remove or replace “Powered by WordPress” through footer or copyright settings. If your theme does not offer this option, you may need to use a child theme, a plugin, or custom CSS carefully.
You can add footer links by creating a footer menu under Appearance > Menus or by adding a Navigation block or widget to a footer widget area. Common footer links include About, Contact, Privacy Policy, Terms of Service, FAQ, and Blog.
Yes, you can add custom code such as tracking scripts, analytics tags, or live chat scripts to the footer. The safest method for beginners is to use a trusted header-and-footer scripts plugin instead of editing theme files directly.
Footer changes may not appear immediately because of browser cache, caching plugins, CDN cache, or theme-specific settings. Clear your cache, refresh the page, and make sure you saved or published the footer changes in the correct editor.