Giỏ hàng hiện không có sản phẩm nào.
If you’re thinking about launching an online store, one of the most important first decisions you’ll make is learning how to shopify sign up and get your store live. Shopify is one of the most popular eCommerce platforms in the world — powering millions of online shops and offering tools that make selling products online simple and scalable.
In this detailed guide, we’ll break down how to sign up for Shopify, what happens after you create an account, and how to prepare your new store for success — all explained in a clear, beginner-friendly way.

Before we get into the sign-up process, let’s briefly explain what Shopify is and why it’s such a powerful choice for new online sellers.
Shopify is a cloud-based eCommerce platform that lets you build, customize, and operate an online store without needing to code. It includes tools for managing products, processing payments, tracking orders, and even promoting your business. The reason so many entrepreneurs choose Shopify is that it combines ease of use with powerful selling tools, whether you’re selling physical products, digital goods, or services.
So if you’re wondering how to go from idea to online store — Shopify is one of the easiest ways to do it.

Let’s walk through the Shopify sign-up process one step at a time. The goal here is to get you from nothing to a fully created Shopify account that you can begin customizing.
To start the process, open your web browser and go to shopify.com. On the homepage, you’ll see a big button that says “Start free trial” — this is the beginning of the Shopify sign-up journey.
Click that button to get started.
On the Shopify registration page, you’ll be asked to:
Your store name is important because Shopify uses it as part of your default store URL (like mystore.myshopify.com). Pick something that reflects your brand and what you plan to sell — but don’t worry too much; you can update branding later.
After filling out the information, click “Create your store.”
Shopify will ask you a few simple questions about your business — for example, whether you’re already selling, what type of products you plan to sell, and where you’re located. These questions help Shopify tailor your dashboard setup, but they don’t lock you into anything — you can change details later.
Just answer what feels right or skip if you’re not sure yet.
Next, you’ll be asked to enter your business address. This is used mainly for billing details and payment setup, and it’s also important for calculating taxes and shipping later on. You can update this information later as needed, so don’t stress if everything isn’t perfect right now.
Once you’ve completed the sign-up form, Shopify will send a confirmation email to the address you entered. Open the email and click the verification link — this confirms your account and links it to your email address.
Now you officially have a Shopify account and access to your Shopify admin dashboard — but we’re not done yet!
Signing up gives you access to your Shopify admin — that’s the place where you control every part of your online store. From here you can:
Shopify offers a free trial so you can spend time setting things up before you choose a paid plan. During the trial, your store is not yet live to the public, and checkout might be password-protected until you select a plan.
The admin dashboard becomes your control panel, and getting familiar with it early will help you manage your store effectively.
Now that you’ve completed the Shopify sign-up process, here’s what you should do next to start building your store:
Products are the core of your online store. In your dashboard:
Clear descriptions and great visuals help convert visitors into buyers.
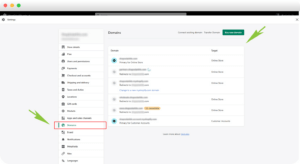
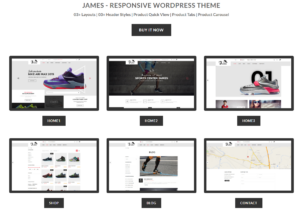
Shopify includes a theme library with free and paid themes. Go to Online Store > Themes to:
Your store’s design plays a big role in customer trust and conversions.
To start selling, you’ll need:
Shopify supports built-in payment options like Shopify Payments, as well as third-party integrations like PayPal or Stripe. Make sure your shipping settings match where you plan to ship your products.
Before you make your store live, go through a few test purchases and navigation checks to make sure everything works smoothly.
Shopify lets you test checkout flows without real charges using a test gateway.
Here are a few extra tips when you’re signing up and building your store:
Signing up for Shopify is an exciting step — it transforms your idea from “maybe someday” into something real. Whether you’re launching a passion project, a side business, or a full-time venture, understanding how to shopify sign up and what to do next sets you up for success.
Remember: the sign-up itself is just the beginning. What makes your store grow is product strategy, store design, marketing, and smooth user experience.
If you’re looking for help beyond the basics — whether that’s designing a custom Shopify store, optimizing your site for conversions, or crafting a brand identity that resonates with customers — that’s exactly where AIRSANG steps in. We specialize in cross-border eCommerce solutions, Shopify sign-up support, and professional website design that helps brands stand out and sell more.
👉 If you want expert guidance in building, launching, or scaling your Shopify store, reach out to us — we’re here to help turn your online business goals into reality.